Spring Yarn Wreath

I was off of work on Friday so I decided to make a new wreath because I didn’t have one for spring yet. I searched through Pintrest and had a couple of ideas. I headed to Joann’s with coupons in hand and settled on trying out a yarn wreath with felt flowers. I bought everything I needed for 11 dollars. Thank you coupons! I love Joann’s because they let you use multiple coupons at once.

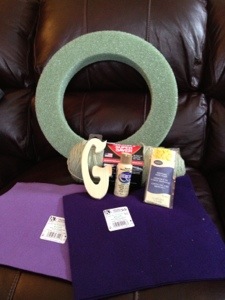
Here are the supplies I assembled, a foam wreath, yarn, felt in different colors, yellow rick rack and then I also had a wood “G” which I ended up not using. So I will save that for another project.

20130331-151250.jpg

So I started off by wrapping the yarn around the wreath and tying a knot in the back. I then proceeded to wrap the yarn tightly around the wreath. Now this for me took a long time. It might be the type of wreath I chose or because I’m a little OCD sometimes. Either way it took me awhile but I turned to my DVR and settled in for some work. Tyler was kind enough to come home and do the last bit for me.

20130331-151328.jpg

20130331-151340.jpg

After finishing the yarn all the way around the wreath I then proceeded to make felt flowers. I searched a lot online to find a good tutorial on how to do it then I had Tyler read it and he helped me with these. What a good husband right?

20130331-151408.jpg

So to begin you cut a wavy circle from the felt. For my larger dark purple flowers I did one big circle from each piece. So you take that wavy circle and begin cutting it in a circular motion and keep cutting until you get to the end. At the end you will have a small circle which you should keep intact.

20130331-151430.jpg

Your next step is to start at the smaller end without the circle and start rolling it up tightly. I tried to keep the wavy end lined up with each other as I continued to circle around. That way once I was done it had a little flowery look to it. It’s hard to explain, it’s a little bit of trial and error. Just wrap it tightly and once you get to the end you will place the circle on the back of the flower.

20130331-151447.jpg

Once I got the circle to the back of the flower I hot glued it down then proceeded to add hot glue wherever I felt like it was needed on the outside of the flower. Then viola, felt flower! They were a lot easier than I had anticipated. Mine don’t look perfect by any means but I thought they turned out pretty good for my first go at it!

20130331-151456.jpg

For the smaller light purple flowers I did two circles per piece of felt. I then took some yellow rick rack and wrapped it around the wreath and hot glued it on in the back.

20130331-151504.jpg

So after that I hot glued the flowers to the wreath in the lay out that I wanted. I then used some yarn to hang it up. Hanging the wreaths is always where I struggle so let me know if you have any great ideas for that?

I was very excited about how this turned out! I love it and it is very springy but can also be used in other seasons too!

Source: How to Make a Yarn Wreath for All Seasons

Wedding Thursday-Maggie and Josh

So I apologize to going back to my old ways of not blogging faithfully but I was on vacation with my family! So I have lots of fun stuff to blog about! I am back from vacation and it is Wedding Thursday and I just attended a wedding this past weekend so how perfect!

My dear friend Maggie got married to her one, Josh, this past weekend. The day started out with pouring rain, loud thunder and lightning. And this was to be an outdoor wedding. But the wedding plans moved forward and by 1 pm the rain and storms had stopped and by 5 pm all was well for an outdoor wedding! From what I hear Maggie handled it with grace, I would have been freaking out had it been pouring rain on my wedding day.

It was a beautiful garden wedding held at a bed and breakfast, complete with corn hole, smores and bbq. It was wonderful! One idea that she had that was similar to my guestbook scrapbook was her guestbook that had a sign by it to find your picture and sign beside it. So I flipped through the book and found a picture of Maggie and myself and signed beside it. Such a cute idea and I am sure so much work!

Maggie had prepared name tags for everyone with your name and a little title. Meg was thrilled to be “Rockstar Dancer” Meg Ballard. I was excited to be titled “Had the most fun wedding ever” Emily Glover. Every little detail was so cute. From the burlap aisle, to her beautiful dress, to the wedding party tunnel the bride and groom exited through. We had a delicious bbq dinner and german chocolate cake prepared by the grooms mother. And the favors were water bottles filled with beans to shake when they made their exit.

It was a beautiful wedding and we had a wonderful time! It is fun to be able to feature a wedding I just attended on Wedding Thursday. My next wedding to attend isn’t until July so I will just have to continue to pull ideas from my wedding, my sisters and my best friends.

20130329-123553.jpg

20130329-123603.jpg

20130329-123625.jpg

20130329-123636.jpg

20130329-123649.jpg

20130329-123658.jpg

20130329-123711.jpg

Down Syndrome- My sister the superstar!

Well yesterday was World Down Syndrome Day and I didn’t get this post done. I was really trying to decide what I would write. My baby sister was born with down syndrome. I say baby sister but she is 18 years old now, 18, oh my gosh. She is way too grown up. I was 8 years old when she was born and I had no idea what it meant when they said she had down syndrome. It didn’t really matter to me I was just excited to have a new baby sister and play mother.

For those of you who don’t know (and I will admit I looked this up to make sure I got the technical details right) down syndrome is when a child is born with 47 chromosomes instead of the usual 46. This causes both physical and mental delays. Each child can have a varying degree of different problems associated with down syndrome. My sister was born with a heart defect and had to have open heart surgery at 6 months.

I once did a speech, in college, educating people on down syndrome. I really wish I had kept it because I remember it being pretty interesting. I do remember talking about little idiosyncrasies that children with down syndrome have. My sister is terrified of indoor house plants. She won’t go near them.

My little sister is the joy of our family. She keeps us all together because she’s always begging us to come home and visit. Then we arrive, she says hello and goes off to do a “show” meaning she sings in her room with a microphone, very loudly. She loves to watch TV, something that we have in common. She loves to swim, we are going to the beach next week and I bet you she will be in that water even though it will only be about 72 degrees at the most outside. She has a wonderful group of friends who are a hoot to watch together. She loves spaghetti and french fries. She can easily convince any one of us to buy her a burger and fries just with an adorable look. She is always smiling and happy. She can always tell if I am upset and is always concerned about everyone.

If you’ve never known anyone with down syndrome then you are missing out, they are sweet, kind and loving. Sure they may be different than us, but that is what makes them so wonderful. So remember that next time you see someone with down syndrome who is bagging your groceries or clearing your table and give them the same smile back that I am sure they will be giving you.

DSCN3643 DSCN3787 DSC_4955 DSC01604 IDM_5648 IDM_5651

Wedding Thursday- Seating Chart

So one of the things I chose to do at my wedding was to have a seating chart. We had a sit down dinner and no excess seating so we thought a seating chart would be a good idea. So then the creative cap had to come on. What was a cute way to do the seating chart? I wanted it to look pretty and fit in with the decor. One weekend in October we visited our wedding venue  to show it to my in-laws and my husband. That’s right, my husband let me pick the wedding venue without ever having seen it in person. I think the words “golf course wedding” helped him agree! He’s a keeper for sure!

IDM_5807

P.S. you can click on the photos to make them bigger to get a better view!

So as we were visiting the venue a couple was about to be married there and I drew inspiration from their seating chart! The idea was to buy a beautiful frame (harder done than you would think) and to have some fabric with the chart pinned on.

We ran with that. We were unable to find a really pretty frame as big as we wanted so we ended up with a nice plain black one. We took a thin foam board and covered it in dark purple fabric and then placed it inside the frame without the glass.

We printed the seating arrangements off the computer and cut them into circles for each table. We took them and stuck them to the fabric (with what I cannot remember) I’m going to say scrapbook tape? But it can be done many ways. Another way I had seen it done with having each one stuck on with pearl push pins but I couldn’t find any.

After sticking them on we added these cute jeweled flowers to each one for a pretty little touch and at the top of the seating chart we put a big rectangle for the head table.

IDM_5809

Most of the credit for this being done must be given to my mom. I think I remember it was a last minute thing and I was already getting beyond stressed and my mom did wonders with my idea!

So this was our idea for the seating chart. I thought it turned out really cute. We had a pretty big frame and then stood it up on an easel that the venue provided.

I am quite excited to get to go to a wedding this weekend. My sweet friend Maggie is getting married and I am so excited for her! And today is my dear friend Amanda’s birthday so a shout out to both of those wonderful friends who I have known since high school! I can’t wait to see them both this weekend and celebrate Maggie and Josh!

AMG_0781 (2)


Pictures by Jessica at Images by Daniel Michael

Happy 1st Day of Spring!

It’s spring y’all! I am excited to say the least. Even though that doesn’t mean an automatic weather change seeing that the high here tomorrow is 39. Fortunately I am flying south on Friday for 5 glorious days of vacation! My husband is kind enough to allow me to go off and vacation while he holds down the fort at home.

So I just realized I have pictures on my camera from a few weeks ago when we went to Ohio for my mom’s birthday. She took a great family picture for us with Dolly. Dolly’s eyes come off a little crazy in the picture but it is a good picture so I had to share!

Family Picture


So this is a short post. Tune in tomorrow for Wedding Thursday for another fun idea from our wedding!

Spring Centerpiece!

It’s the last day of winter! Hard to believe because it snowed here yesterday and my friend in Boston woke up to 6 inches of snow this morning. But I’m sure the warm weather is just around the corner. Patience is key! So in excitement about spring coming I did a small amount of spring decorating over the weekend. By small I mean I created a spring/easter centerpiece. Since Easter is so early this year it will continue throughout the spring as the table centerpiece. You can see the remnants of Valentine’s decorating still up so the spring stuff needed to replace it!

I kind of just meandered through the aisles of Michaels and dreamed up this centerpiece. After doing my fall centerpiece which was a take on some ideas I’d seen on Pintrest I just decided to go to the store and find things!

I was excited to find these pastel plastic easter eggs that looked pretty and not tacky. So I got two bags of them and used them to fill up the vase I got for a wedding gift. I then purchased some fake flowers that matched with the eggs. And a couple of stems of flowers with easter things interspersed throughout. And a couple of pretty stems with just a pretty easter egg on the end.

So it was very simple and then viola we have a touch of spring/easter in our kitchen! That’s really all the spring decorating I have done. I think I like decorating for fall and Christmas the best but I am really excited about the warm weather that is coming.

On another exciting note my flowers are beginning to bloom! I think we shared with you all in October when we planted flower bulbs and they are beginning to bloom! I will post pictures soon!

Happy Last Day of Winter!!!

My supplies!

20130319-135305.jpg

And the finished product! 

20130319-135323.jpg

Weekend Wrap-Up

We had a really fun weekend with really nice weather that then turned to snow this morning? So strange.

Friday was so nice and warm so we ate leftovers for dinner then went shopping! I hadn’t been on a good shopping spree in awhile so it was a lot of fun! I got some for my easter/spring centerpiece which I will post about later this week so stay tuned!

Saturday morning we tried out breakfast at a local restaurant close to our house! We had a delicious breakfast then drove around looking at local sites. I then went to get a pedicure to prepare for my trip next week to the beach!! I can’t wait. Hopefully it will be sunny and in the 70’s and I will be happy!

We found a new favorite show on Saturday, Property Wars on the Discovery Channel. If you have not watched it before then you should because it is such a fun show! Saturday night we had date night and went to The Cheesecake Factory for dinner to celebrate 9 months of marriage! We then went to see Safe Haven which was really good!

Sunday we went to community group, church then had brunch with our friends Matt and Katie at Cracker Barrel. Does it get much better than Cracker Barrel for home cooking not at home? I don’t think so. Grocery shopping then a lazy day around the house. We discovered another new show. Downton Abbey. We watched the pilot and now I can’t wait to get home tonight and watch another episode!

So that was our weekend in all it’s glory! We had a fun time and enjoyed it. Next weekend I will be out of town and it will be the first time we’ve been apart over night since we got married 😦 I hope you all had a wonderful weekend!


2 3

It’s Friday!

What was the one experience that completely changed your life? What happened? How did it change your life?

So who knew that there was an “Inspire me” button to click when you start to post and realize you have nothing to post about? How fun is that. So I liked the inspire me and thought I would post up the story of how Tyler and I met for those of you who don’t know. It explains why our blog has the subtitle “all because Memaw can use Facebook”

I will try to keep this short, sweet and to the point. Tyler and I probably met once before when we were just youngsters. My uncle was the pastor at his church and since my grandparents lived in the same town we visited frequently and attended church with them. We have no pictures or proof but I like to believe we did.

Many years later I took a job as a nanny for a military family in the DC area and my Memaw decided because I lived in the DC area and Tyler did too that well we had to meet. So she took to Facebook to show her social media and matchmaking skills and contacted Tyler’s mom to get his contact info and to give mine to him. Next thing I knew I had a voicemail from a boy named Tyler who said my grandmother had told him to call me. Great pick up line right? Well lucky for him I thought he had a nice voice so I called him back.

We arranged to have our first date at the movies and saw the movie Killers and well the rest is history. 13 months later to the date we were engaged and 2 years and 12 days after meeting we were married. Best decision I ever made and one of the boldest I’ve ever made to step out of my comfort zone and go meet a random guy at the moves.

Memaw is pretty proud of her matchmaking skills so I have extended my apologies to the rest of her 14 grandchildren. Although she might want to stop after her first success, it would be a shame to tarnish that perfect record!

Our first photo together!

DSCN5063

And our most recent, from our snow day!!

DSC00549

Wedding Thursday!

It’s Thursday again! I love Thursdays, it’s almost the weekend, my favorite show comes on tv (The Vampire Diaries) and yeah it’s a good day. But enough about that. It’s time for another installment of Wedding Reminiscing Fun Thursday!

This week i am going to blog about my table numbers. They were one of my absolute favorite ideas for my wedding. I found a similar idea on Pintrest and then made my own version.

So the table numbers were done with pictures of us at the age of the table. So table number 1 had pictures of Tyler and myself at age 1. My initial idea was to do the pictures side by side so you could see us at the same age. But that ended up being too big for the holders. So we ended up doing a picture of me on one side then Tyler on the other side. That way no matter where you sat you would see a picture of someone and not a blank side.

I bought a big pack of gray, black and white scrapbook paper with different prints and then cut out a square a bit bigger than the 4×6 picture so there was a border. I would cut out two for each table number and stick them together using scrapbook tape. That way both sides had the same border from the paper.

The next step was to find pictures at that age that were both either horizontal or vertical. We found that a bit tricky but it all depends on what pictures you have. Once we had the pictures we stuck one to each side.

For the numbers we cut circles out of white card stock and printed on them “Us at age 1” “Us at age 2” etc. You will see from the picture. We stuck those on the top corner and then viola we had the cutest table numbers! I just loved them and it was fun for everyone to see pictures of us throughout the years and look at what each of us looked like at that age.

I hope someone finds this idea fun, cute and useful! Let me know your thoughts 🙂

IDM_5812 IDM_5813


Pictures by Jessica at Images by Daniel Michael

Give me some more, Spaghetti Amore!


I FINALLY remembered to take a picture of this meal. I set an alarm in my phone and everything. This is one of my favorite casseroles and it is a comfort food for me because I got this recipe from my mom. It is delicious and easy. I hope you enjoy this as much as I do.

Ingredients:
1 lb. ground beef
1/2 cup chopped onion (Once again I always leave out onion)
1 cup shredded cheddar cheese
1 can cream of mushroom soup
1 can tomato soup
1 can water
1 minced garlic clove (or garlic powder)
1/2 lb. spaghetti

Directions:
Brown beef and onion
Add soup, water, garlic- heat
Blend in 1/2 cup of cheese and cooked, drained spaghetti
Pour into 3 quart casserole dish and top with remaining 1/2 cup of cheese
Bake at 350, uncovered for about 30 minutes or until bubbly
Serves 4-6
Can be frozen and reheated

I love this recipe as does my husband and my family and in my nanny experience I have found it to be kid-friendly. I hope you enjoy and let me know if you do 🙂

ImageImage